HTML Tutorial For Beginners: Easy Way To Learn HTML
Looking at code or trying to learn a different language can be intimidating at first, but in this HTML tutorial for beginners, I will show you how to look at HTML code a little differently by seeing the whole picture as well as the different parts that need to come together.
Table of Contents
- What Is HTML?
- Basic Structure of HTML
- Let’s Break It Down
- Visually
- Creating Your First HTML Page
- File Structure & Organization
- Create index.html file
- Framework
- Content
- Seeing The Results
- Common HTML Tags
- What’s Next?
What Is HTML?
HTML stands for Hyper Text Markup Language. It’s the foundation for building websites and is used to display text, images, video, and other content on a web browser. Learning HTML is relatively simple and can be a lot of fun.
Here is the basic structure of an HTML page
HTML elements and tags are the building blocks for creating websites.
<!DOCTYPE html>
<html>
<head>
<title>Page Title</title>
</head>
<body>

<h1>My First Heading</h1>
<p>My first paragraph.</p>

</body>
</html>
Let’s break it down
Most HTML elements have an opening tag < > and closing tag < / >. The only difference between the two tags is that the closing tag has a slash /. Think of it as containers inside of each other.

Visually
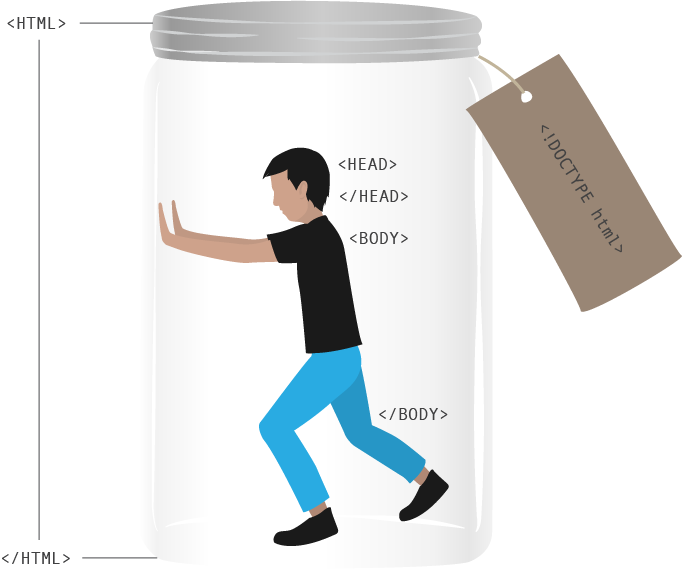
Imagine yourself or someone else (if you are claustrophobic) inside of a jar or container. The jar represents the HTML container and you represent all of the elements used to display the website.
Take a look at the image above. The main container is <html></html> and all of the other elements live inside of this larger container. First you have a <head></head> and then you have the <body></body>. Inside the <head> element will be tags such as <title>, <meta>, and scripts such as links to CSS and Javascript. The <body> element will include visual elements that will be rendered by the browser such as paragraphs and images.
<p>This is a paragraph that will be seen on a website.</p>Creating your first HTML web page
Let’s get ready to create our first HTML document and then we will display it in your web browser. Before we begin, lets talk about some organization.
File Structure and Organization
Websites are made up of assets such as HTML files, images, CSS, Javascript, etc. The code will reference these assets so we need to keep everything organized in folders. I usually start a new folder and name it whatever website or project you are starting. Inside that folder will have all your website pages and subfolders with images and scripts.
Example File Structure
- MyFirstWebsite.com
- index.html
- Images folder
Create index.html file
You can use any kind of text editor to create an HTML document. It just needs to have the extension .html at the end. So open up a simple text editor such as Notepad (PC) or TextEdit (Mac). You can even use Microsoft Word. Start a new document and save it as index.html (this will be the first file the server looks for on the server).
Framework
Now we need to set up our page by adding all the necessary elements to display our content.
- Let’s start typing in the index.html file you just created. We’re going to declare the document as an HTML page so type <!DOCTYPE html>. This does not need a closing tag and will sit at the very top of the document.
- Let’s create the main container that holds everything together. Type <html> and the closing tag </html>. This element will be the head and body tags.
- Between <html> and </html>, type <head></head>. This is where we will place CSS and scripts. Think of it as the brains of the website.
- After the <head></head>, type <body></body>. The body element will hold everything that will be shown to the viewer.
You should have something that looks like this:
<!DOCTYPE html>
<html>
<head>
</head>
<body>
</body>
</html>
We just created the basic structure for our web page. Pretty easy right? Now let’s put some content in.
Content
Now that we have our page set up, it’s time to add some content including text that will be displayed to the viewer on a web browser.
- Page Title: We are going to title our page so search engines like Google will know what our page is about. Between the <head></head> element, lets put something like “My First Website: Learning HTML is easy and fun!” This is not actually visible on the page itself but will show on top of the Web Browser and is the title you see when doing a search on Google. It is an important piece of SEO (Search Engine Optimization).
- Headings: Let’s put some content in the <body></body> element so we can see some content on our web page. HTML uses <h1></h1>, <h2></h2>, <h3></h3>, etc. for text headings. H1 is usually the largest font size and used for the main page titles and H2 could be the subheading or secondary content. This creates hierarchy and organizes content in the order of importance. Between the <body></body> element, let’s add <h1>My First Web Page</h1>.
- Paragraphs: Paragraphs are defined by the <p></p> tags. Put something like this under the <h1></h1> tags… <p>Hello world! Look at me, I just created my first web site!</p>.
Your index.html document should look something like this.
<!DOCTYPE html>
<html>

<head>
<title>My First Website: Learning HTML is easy and fun!
</title>
</head>

<body>
<h1>My First Web Page</h1>
<p>Hello world! Look at me, I just created my first web site!</p>
</body>

</html>
Seeing the results
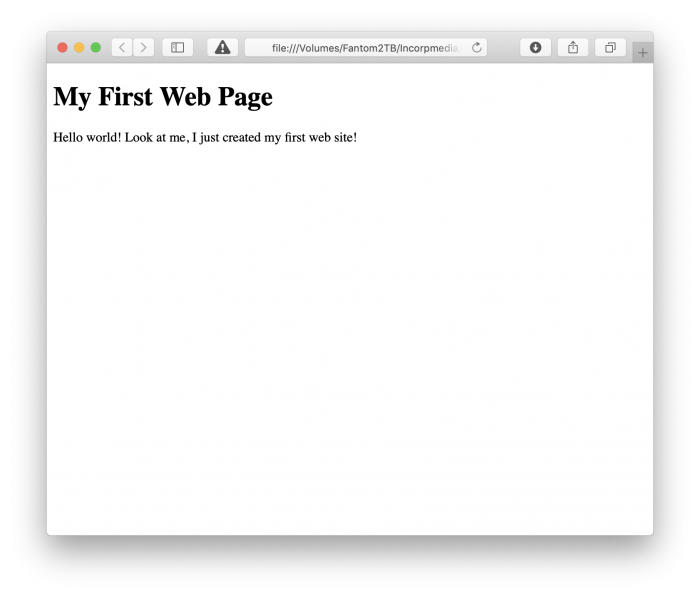
Congrats on creating your first HTML page! Now, let’s view our page on a web browser to see how it looks. Go to where your index.html file is and right-click on it to open it up in your favorite browser. You can also open the file from the browser or just drag and drop the file into the browser to view.
If you did everything right, you should see something similar to the image below. If not, go back through the steps to see what’s missing. Here’s what mine looks like in Safari.

Common HTML Tags
Let’s take a look at some of the most common HTML tags. We already talked a little about headings <h1> and paragraphs <p>. Here’s a list of other common tags.
Bold Text: <strong></strong> (Used to bold text)
Italic: <em></em> (Used to italicize text)
Underline: <u></u> (Underlines text)
Line Break: <br> (Used to return text to the next line)
Horizontal Rule: <hr> (Used as a separater)
Hyperlink: <a href=”http://webdesignengine.com”></a> (Used to link to websites, different pages, and emails)
Image: <img> (Used to display images)
Practice Adding Some Tags
Let’s add some of these common tags to our HTML document.
<!DOCTYPE html>
<html>
<head>
<title>My First Website: Learning HTML is easy and fun!
</title>
</head>
<body>
<h1>My First Web Page</h1>
<p><strong>Hello</strong> <em>world</em>! <u>Look</u> at me, <br>
I just created my first <a href="http://webdesignengine.com">website</a>!</p>
</body>
</html>
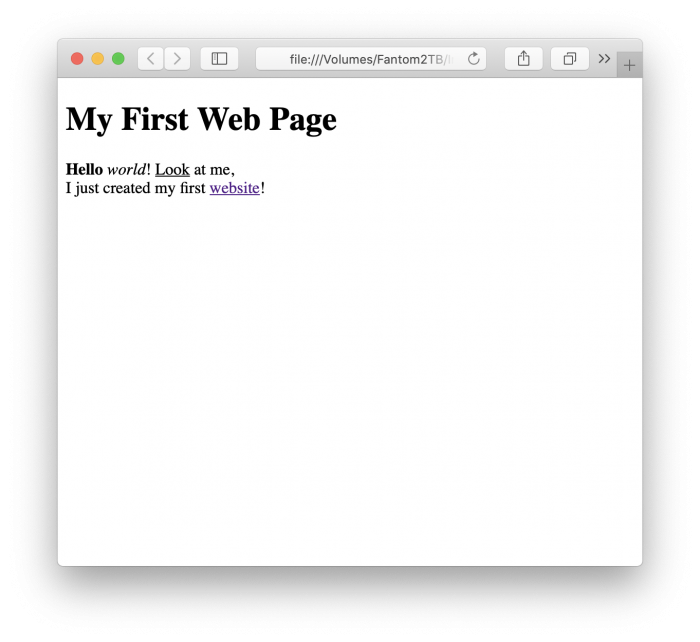
Refresh your browser or follow the instructions above to view your updated page. Your page should look something like the screenshot below.

Images
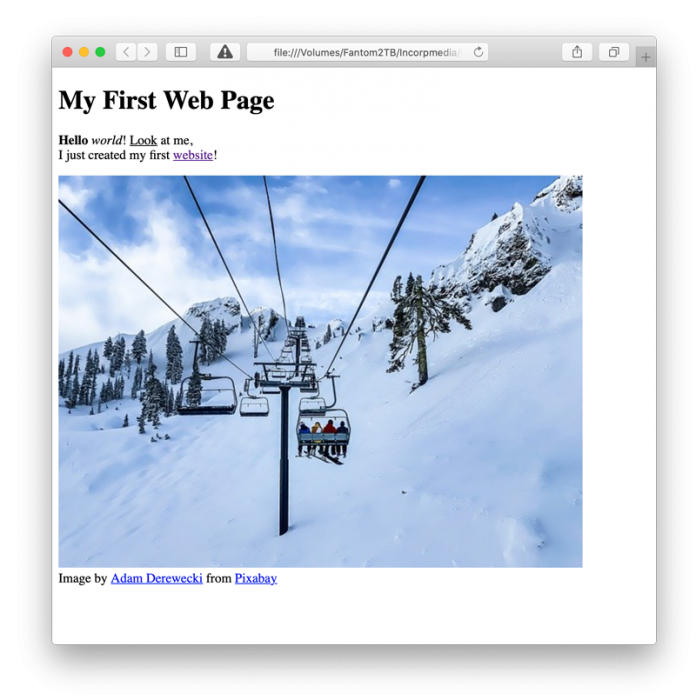
Images are essential to most websites so lets take a look at how to add images to our page. We’ll start by adding an an image to our “Images” folder that we created in our previous steps. You can either save one of your images you already have on your computer or you can download an image from the internet.
I am going to use a free photo from Pixabay.com. Pixabay gives you the option to download smaller files for the web so they are optimized for faster load times. Higher resolution images are great for print, video, and higher resolution displays.
Add this code to somewhere between the <body></body> tags. I’ll add mine below to our other text.
<img src=”images/skiing.jpg” alt=”Photo by Adam Derewecki” />
The “alt” attribute is used for SEO and for viewers who turn off images while browsing so it’s good practice to always have alt description for your images.
Here is the full code
<!DOCTYPE html>
<html>
<head>
<title>My First Website: Learning HTML is easy and fun!
</title>
</head>
<body>
<h1>My First Web Page</h1>
<p><strong>Hello</strong> <em>world</em>! <u>Look</u> at me, <br>
I just created my first <a href="http://webdesignengine.com">website</a>!</p>

<img src="images/skiing.jpg" alt="Photo by Adam Derewecki" /> <br>
Image by <a href="https://pixabay.com/users/derwiki-562673/?utm_source=link-attribution&utm_medium=referral&utm_campaign=image&utm_content=4835024">Adam Derewecki</a> from <a href="https://pixabay.com/?utm_source=link-attribution&utm_medium=referral&utm_campaign=image&utm_content=4835024">Pixabay</a>
</body>
</html>
Refresh your browser to see the new image. I added some additional photo credits for the image I downloaded from Pixabay. It is not required but appreciated by the photographer.
What’s Next?
Hopefully, you were able to follow along and have a better understanding of how websites work. You learned the foundations of HTML and how to put together a simple web page with text and images. There’s much more to learn, including styling our website with CSS (cascading style sheets), Javascript, and FTP (file transfer protocol). I’ll cover some of these topics in more posts soon.
I hope you found this introduction to HTML useful and easy to follow along. Please comment and let me know if I can improve on any of the steps above. Thanks and happy coding : )


